Grass Seed 101: Choosing and Planting

Last updated: Sep 12 2022

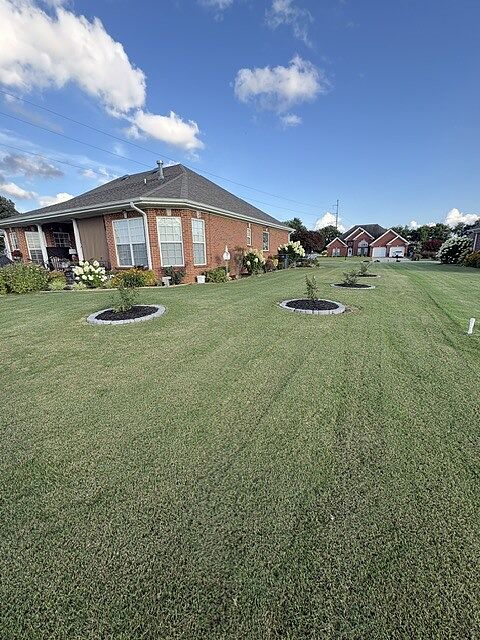
There’s nothing quite as inviting as a lush green lawn. Or maybe you prefer the manicured grass of a golf course or football field. However you enjoy grass the best, no one can deny there’s something about a green lawn that draws you in. So, how do you get that in your own yard?
It's easier than you might think! And most of the work comes before you even plant the seeds, so read on to set yourself up for fewer headaches and more grass.
Grass Basics You Need to Know
There are a few things we need to cover before we just pick a grass seed and start planting:
- Grass is a LARGE category of plants in the Poaceae family, which covers everything from bamboo to grass. When talking about the kind of grass in your yard, we call this "turfgrass.” Turfgrass is in its own category when it comes to the world of horticulture–there are even turfgrass professionals that often work at golf courses or sports fields.
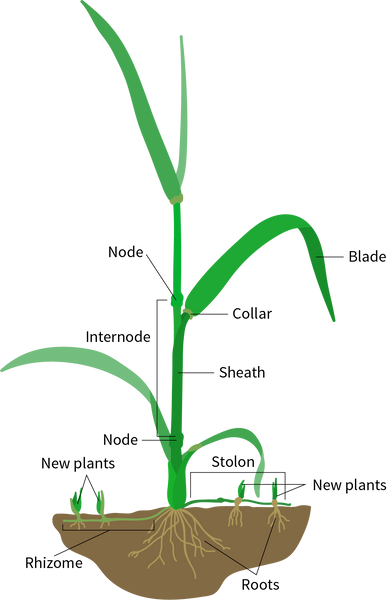
- Grass is a plant just like any other, but its unique properties allow for it to be routinely cut short without harm, which makes it a good groundcover. Next time you look at grass, follow one blade down, and chances are you’ll notice there are more blades that emerge right above the ground. That point of growth is called a “node.” The closer the node is to the ground, the shorter you can cut the grass without killing it. If you cut that lower node, then you prevent further growth. This is also known as “scalping.”
Refer to the diagram here to learn the various parts of grass:
- There are two main categories of turfgrass: warm season and cool season grasses. The difference between them is the location in which they grow best and the certain temperature they need for germination (the seed sprouting). The specific grass varieties will be covered in more detail later.
- Cool season grasses do best in cooler areas where the temperature stays around 90℉. The best time to plant is fall and spring as the temperatures are on the milder side and not too cold or too hot.
- Warm season grasses prefer the heat! They’re best in areas where the ground won’t freeze and are planted during early summer.
- Growing zones don’t apply to turfgrasses. You might be familiar with growing zones and how they help you decide what will grow well in your area. Grass has a similar system, but instead of sorting zones from the average temperatures and numbering them, turfgrass looks at the climate and regional areas. Look at the map below to find your turfgrass growing zone.

- Understand that to have a perfect lawn, there’s a lot of effort that goes into it. You can’t just toss seed out and forget about it. Instead, you’ll need to put in time and effort when it comes to lawn maintenance. For most homeowners, weekly maintenance is required, but if you set yourself up right, the care is the easy part.
Starting Your Grass Seed Project
If you’re going to spend the time and money on your lawn you want to make sure you’re going to like what you plant. Go outside and take a good look at your lawn, and while you're out there, answer these key questions:
- Where is your project area? Backyard, front yard, just that one area by the driveway? Be specific!
- What are you starting with? 0-10% is bare, 10-30% is patchy, 30% and up is overseeding.
- What kind of grass is already there? Note the kind if you can and if it's doing well!
- Locate problem areas and the issues in that area. Maybe you have an overly worn or soggy area by the driveway, or the dog has a favorite spot to do his business so nothing grows.
- What purpose will the yard be primarily used for? Do you have heavy foot traffic due to pets and kids, or do you use your yard for more leisurely activities like lounging and picnics?
- How often are you willing to do maintenance? This is a big one, so be honest about how much time you have to spend on upkeep and how tidy you want your yard to be.
- Do you have an HOA with yard restrictions? Do yourself a favor and double check!
- Do you want a green lawn all year round or are you okay with it going brown and dormant?
Types of Turfgrass
Cool Season Grasses
Cool season grasses do best in areas where the average temperature doesn't exceed 90℉ for long periods of time. Plant during the spring or fall since you need an average temperature of 60-85℉ for germination to occur.
Tall Fescue
|
Uses |
Pasture grass, lawns, playgrounds, along roads, athletic fields |
|
Best Zone |
Cool-humid and cool-arid zones and warm-arid and warm-humid zones with high elevations |
|
Features |
|
|
Maintenance Level |
Low |
|
Minimum Mowing Height |
3” |
|
Days to Germination |
7-14 |
|
Helpful Tips |
Tall fescue is not the softest grass, but what it lacks in softness it makes up for in strength and low maintenance. |
Red Fescue

|
Uses |
Good all-purpose grass for sunny and partially shaded areas |
|
Best Zone |
Cool-arid and cool-humid zones and warm-humid and warm-arid zones in high elevations |
|
Features |
|
|
Maintenance Level |
Low |
|
Minimum Mowing Height |
2-3” |
|
Days to Germination |
5-14 |
|
Helpful Tips |
Fine fescue is used as a catch-all for any fescue with a fine texture or thin leaves. Fescues that fall into this category are chewing fescue, red fescue, and hard fescue, just to name a few. |
Ryegrass

|
Uses |
Near roads, driveways and walkways, lawns, overseeding warm-season grasses |
|
Best Zone |
Cool season to transition |
|
Features |
|
|
Maintenance Level |
Low |
|
Minimum Mowing Height |
2-3” |
|
Days to Germination |
3-10 |
|
Helpful Tips |
Ryegrass will grow quickly upwards but may need some help to fix damaged areas and patches. |
Kentucky Bluegrass

|
Uses |
Lawns, golf fairways, areas needing dense turf |
|
Best Zone |
Full sun, transition zone |
|
Features |
|
|
Maintenance Level |
Moderate |
|
Minimum Mowing Height |
2.5-3” |
|
Days to Germination |
14-28 |
|
Helpful Tips |
Many beautiful lawns you see are made of this grass since its fine texture and deep color make it attractive. It’s also tolerant of harsh weather and will go dormant quickly in times of drought. However, it’s quick to bounce back and regain color once water conditions improve. |
Warm Season Grasses
Warm season grasses do best in areas where the ground temperature never reaches freezing or 32℉. Plant during the early summer season since these grasses need a consistent period of heat to germinate.
Zoysia (Pronounced Zoy-Sha)

|
Uses |
High traffic, sports fields, golf courses |
|
Best Zone |
Warm season zone, transition zone |
|
Features |
|
|
Maintenance Level |
Moderate |
|
Minimum Mowing Height |
1.5” |
|
Days to Germination |
10-14 |
|
Helpful Tips |
It’s best to bag all the grass clippings for the best health of your lawn. |
St. Augustine

|
Uses |
Golf course roughs, high tolerance lawns, mixed with other kinds of grasses |
|
Best Zone |
Warm season zone |
|
Features |
|
|
Maintenance Level |
High |
|
Minimum Mowing Height |
2.5-3.5” |
|
Days to Germination |
11-14 |
|
Helpful Tips |
If grown alone, St. Augustine is very coarse and not very attractive. You’ll often find St. Augustine blended with other grasses for this reason. |
Bermuda

|
Uses |
High traffic areas, golf course putting green |
|
Best Zone |
Warm season zone, transition zone, full sun with no shade |
|
Features |
|
|
Maintenance Level |
Low |
|
Minimum Mowing Height |
1-1.5” |
|
Days to Germination |
7-15 |
|
Helpful Tips |
Bermuda likes to grow and will need edging to keep it where it’s supposed to be. Use edging if you have garden beds and walkways. |
Check out our quick video here to learn the differences between our Sun & Shade, Bermuda and Tall Fescue varieties:
Grass Seed Quick Guide
Remember, you can always have more than one kind of grass planted in your yard at one time. This is very common and referred to as mixes when looking at grass seed labels.
- For a kid-proof turf look for mixes that contain two or more of the following: tall fescue, fine fescue, Kentucky bluegrass, zoysia, Bermuda, or Bahiagrass.
- For shaded areas look for mixes that contain two or more of the following: rough bluegrass, chewings fescue, tall fescue, St. Augustine, centipede, Bahiagrass, zoysia.
- For sun and shaded areas look for mixes that contain two or more of the following: Kentucky bluegrass, fine fescue, perennial ryegrass, Bermuda, centipede, and zoysia grass.
Refer to our grass seed comparison chart here for further help:
|
Tall Fescue |
Fine Fescue |
Ryegrass |
Bermuda |
Zoysia |
|
Low maintenance Cool and warm zones Shade and heat tolerant with bright color |
Low maintenance Cool to warm zones Moderate shade tolerance, gray spot resistant, cold tolerant |
Low maintenance Cool to transition zones Rapid growth, long growing season and shiny leaves |
Low maintenance Warm to transition zones Fast, dense growth with drought and salt tolerance |
Moderate maintenance Warm to transition zones Shade tolerant, deep green color with a coarse texture |
Seed Selection
Not all grasses are made the same. Some grasses feature resistance to certain issues while others feature less frequent mowing. Review each kind, and based on your location and the answers to the questions above, choose a variety that will suit your needs and also grow well in your area.
How to Read the Grass Seed Label
Next time you have a bag of grass seed, look for the part of the bag that looks like a nutrition label. This is where you find out what's actually in the bag and see if the bold claims on the front of the packaging hold true.
There might be a lot on the label, but just think of it as a nutrition label. You really only need to focus on some key items. Pay attention to the germination rate, as this will tell you the fertility of the seed and how likely it is to sprout and successfully grow in your yard. The higher the number the more vital the seed is. Next, look at the crop seed and weed seed values. These both should be close to 0 as they can be, but never 0, as nothing is perfect. This way you’ll have confidence you’re getting your money's worth of seeds per pound.
Refer to the graphic here to better understand grass seed labels:

Uncoated vs. Coated Seed
If you’ve looked at and compared bags of grass seeds before, you might have noticed that some seeds are coated while others aren’t.
One isn’t better than the other, and choosing one is a matter of personal preference. If you aren’t sure, take a close look at your seeds. Oftentimes, coated seeds will have a bright color or powdery coating to them.
Coated seed (shown below) has the advantage of holding onto water, preventing the seeds from drying out, and oftentimes nutrients and fungicides to protect it once it sprouts. In addition to the coating, you’ll often notice a bright color, making it easy to see whether you’ve scattered seeds or not. Coated seeds are viewed as more user-friendly for these very reasons.

Uncoated seed (shown below) is seen as more pure and some argue that it's more bang for your buck since most grass seed bags are sold by weight, and no added weight of the coating means more seeds. Some also prefer uncoated seeds if they like to add nutrients of their own to the soil. Uncoated seeds can be used by any person regardless of experience but tend to be less forgiving than the coated seeds during planting.

How to Plant Grass Like a Pro
Evaluation
If you haven't taken a recent look at your lawn, now is the time to do so! Take a good look around for any differences. Remind yourself of your wants and things you noticed during your initial evaluation (the questions above). Write down any changes. If you’re new to the area and want to go the extra mile, we highly recommend soil testing. To test your soil, contact your local extension office or pick up an at home kit–aim for a pH of 6-7.
Prep
Remember those problem areas you noticed when starting your project? Now is the time to fix them! Aim for consistency in the texture of your planting area by making sure the soil is uniform, ideally in pea-sized clumps around 4 inches down. Avoid chunks of clay or topsoil just sitting on top, for example. And remove any existing weeds, rocks, or unwanted grasses.
Common Issues & Solutions
- Compacted soil: Nothing will grow, oftentimes next to a driveway or footpath. To solve this you need to break up the soil with a hoe or a soil pick. This might take some work, but your plants will grow ten times better in loose soil. For larger compacted sites, consider a tiller machine to help get the job done quickly. Aim for a light and easy-to-dig-in texture.
- Overly dry soil: Look and see if that area is higher than the rest or is dry for any particular reason. You can even that area out with a shovel and a rake or make it blend in with areas around it by adding topsoil.
- FGT Pro Tip: When adding topsoil, make sure you’re not inviting any grass or weeds into your area. Be sure to get a quality blend.
- Overly wet soil: Look for low spots, or during the next rain, see how the water travels through your yard. Figure out ways to re-route the excess water and level out the low areas.
- Your pet's favorite spot to go to the bathroom: This depends on your preference. You can choose to designate this area as a bathroom for your furry friend or try to guide your dog to go in other areas.
Plan
Every project should have a plan. Take a quick inventory of what you have and make note of what you’ll need. Being organized will only help your project go smoother!
- Grass seed (calculate how much seed you’ll need here)
- Starter fertilizer
- Topsoil (get ½ cubic yard of soil for each square foot of your yard for a 6-inch layer)
- Garden hose or sprinkler
- Rake
- Wheelbarrow
- Spreader
- Gloves (optional)
FGT Pro Tip: After you’ve gathered all of your supplies, you can optionally add a grass starter. Grass starters help prep the ground and block out fungal growth, making it easier for the seed to sprout. We would suggest this if you’re starting your lawn from scratch or if you’ve had difficulty in the past. Read the label for proper application, as most starters need to go down before you spread grass seed.
Planting
When it comes to planting you have a few methods you can use. Determine which one will best suit your needs and don't be afraid to do a test patch first! Trying a small area to get an idea of what to expect is a great idea, especially if you’re new to planting grass.

Method One: Pre-Germinating Seed
Pre-germinating seed is a method that saves water and runoff. In this method, you soak the seed in a bucket of water until it sprouts, then you scatter it on the lawn. By soaking the seed, your lawn is less likely to dry out, saving you water and time once scattered.
Find a large container that will hold your grass seed. The five gallon construction buckets will work well, but if you have more seed, try a wheelbarrow. Next, submerge your seed in the water for around two days. Using a paint strainer, cheese cloth or another kind of barrier to easily separate the seed from the water is key!
Change out the water around twice over the two-day period and then you’re ready to scatter your seeds! Follow the spreading settings on the bag and start on the edges of your property, working your way towards the center in lines as you would when mowing the lawn. Once your seed is scattered, check for even coverage and use a rake to even things out or cover spots you missed.
Next, water your lawn lightly and daily. Continue until your grass has sprouted and is around one inch. At this time, cut your watering in half and let the water soak into the soil around four inches to encourage rooting. Avoid overwatering and only supplement in the absence of rainfall, gradually lightening up over a month as your grass becomes established.
Method Two: Sowing Seed in the Ground
Sowing the seeds in the ground is the most common method and quite simple. This often involves a spreader and you walk in lines to scatter the seed evenly on your lawn. You can choose to spread the seed by hand or use a spreading tool that you hold or push.
FGT Pro Tip: Check your local weather and aim to plant during more mild days to avoid the risk of any flash flooding that might ruin all your work.
Locate the recommended spreader settings on your grass seed bag and adjust your spreader before placing the seeds in. If you’re scattering by hand, aim for the recommended density on the bag.
Place the seed in the spreader and start at the edge of your property. Finish the edges first and gradually work towards the middle as you would mow the lawn to make sure you don't miss any areas. Even out the seed with a rake.
Water the seed well and stick to a watering schedule. If needed, apply a light layer of soil or straw to prevent seeds from washing away. Evenly water your newly seeded area with light water pressure to avoid soil and seed displacement. The goal is to keep the seeds moist for the first week or two to help them sprout. Avoid saturating the soil, as seeds are on the top. You don't need to worry about water soaking in just yet. This will also help reduce overwatering and fungal issues.

As your grass sprouts, keep up with the watering but cut back to around half the amount of water you were providing the seeds and let the water not just sit on top but go deeper into the soil around 4 inches. After a month, water every few days in the absence of rain, and avoid overwatering!
Protecting New Growth
If you’re planting the seed you better believe you’re going to be protective of it! While we don’t suggest setting a lawn chair to guard it day and night, we do think keeping pets and people off of your freshly seeded areas is a good idea. Hold off from mowing, as well, to avoid damage to the new sprouts.
Once your grass has grown to a minimum height of three inches you can mow your lawn. Do a small trim and don’t cut back more than a third of the total height. If you experience your new seedlings being uprooted, it might be because the ground is too wet, the lawn still needs to grow a bit, or your lawn mower blades are really dull.
Don’t get discouraged when it comes to planting your lawn! Choosing from all the options out there can be overwhelming, but start by taking a good look at your existing lawn and determining what you want out of your grass. From there, narrow your options further by your location. The secret to successfully germinating your lawn is the planning and preparation before you plant. So, research grass varieties, ask around, and don’t forget to read some grass labels!
Be sure to read through the rest of our Grass Seed 101 Course so you can achieve the lively lawn you’re after!
Written by
Meredith Gaines
Meredith's love for plants started at a young age, and only grew when she started working in the Desert Exhibit at the South Carolina Botanical Gardens and the Historic Filoli Estate in the Bay Area. After graduating from Clemson University (GO TIGERS!) with a degree in Biology and Horticulture, she found her niche in the FastGrowingTrees.com family as a horticulturist and has grown in her current role as Senior Plant Expert.
She currently resides in her hometown of Charlotte, North Carolina, and enjoys spending any time she can outdoors. She learns new things about plants every day and loves sharing her plant knowledge and tips with those around her. Her favorite plant is constantly changing, but her long-time favorites are peonies, oak trees, and ferns.