Download and print the companion worksheet for this module!
Pick up your shovel and let's get to work! Now that you have your plan in place, it’s time to make it a reality. This step can be done with the help of friends, family, a professional crew, or on your own. Since each project is unique, decide which option fits your budget and landscape the best.
No time to spare? Skip to a specific section by using the corresponding text below!
- Getting Started
- Process Overview
- Finalizing the Layout
- Planting Your Trees, Shrubs & Grass
- Helpful Bonus Tips
Getting Started
To get started, make sure you have the following:
- The plants you’re going to install
- A layout or map that shows where each plant will go
- Tools like shovels, a wheelbarrow, and rakes
- Any other materials like stones, gravel, mulch, weed cloth, etc.
- A list of areas that will need equipment or outside help
How the Installation Process Works
You might already be familiar with how to plant a tree, but are you familiar with how a landscape is transformed? Whether your project area is small or large, being organized is key so that you don’t miss any vital steps. Below is a general outline of how a design is installed to help make the process a little easier.
1. Clean Up
Get started on your project by clearing out debris and removing unwanted plants and trees. Move potted plants, decorations, and outdoor furniture to a safe place until later in your project to avoid damage. Now is also a good time to mark out the areas of your yard like a new garden bed or existing features that you wish to protect like utility lines. For older trees that need to be cut down, hire a professional crew to do it safely.
FGT Tip: If you’re hesitant about disposing of existing plants that aren’t in your landscape design, try transplanting them to another part of your property or finding another location to let them grow!
2. Site Preparation
If your yard needs to be leveled, a slope needs grading or a ditch needs filling, do it at this time. Once you have pavers down, concrete poured and plants in the ground, you won’t be able to shape your landscape like you can now. Take time and make sure it’s how you like it before moving on to the next step. Equipment and topsoil may be needed, depending on how much work needs to be done, so don’t forget to add this to your budget!
3. Construction
Grab your hard hat! If your plan includes a new patio, deck, fountain, or other permanent features, you can begin adding those now. This can be as simple as a weekend project, or you might need to hire a contractor. Having these features installed now before plants are in place avoids unnecessary stress on both you and your plants.
Below, we've designed a DIY grapevine arbor to give you an example of creating a permanent landscape feature.
4. Installation
The foundation work is complete and now it’s time to refer to your landscape design. Measure and mark out your planting beds and install the edging. Place in landscape lighting or an irrigation system and be sure to put flags by them to avoid damage that could occur. After this step of your project you should have all of the base hard features installed so you can get to planting!
5. Soil Preparation
Different plants have different soil needs. During this stage, refer to your plant shopping list to reference the soil requirements of each plant. For compacted or clay soil we recommend using a tiller or a hoe to break up the soil (reduces compaction) and incorporating compost (aids with drainage). If you have soil that’s low in fertility, add a soil starter like Root Rocket to introduce and start a healthy microbiome. For areas that are too dry, add compost to help retain moisture and plan to mulch around your plants. Other soil additives to change the pH of the soil can also be added. Just reference your list and go bed by bed evaluating and altering the soil as needed.
6. Planting
Now, it’s time to plant! We’ll cover this step in more detail below, but make sure to give each plant a good start is important for long term success. For projects with a lot of planting you might not get to all of them in a day, and that’s okay! Simply store your plants in a protected area and give them water until they’re able to be planted. And don’t forget to plant your container plants too. If planting grass, rope off the areas to ensure the seeds can grow properly.
7. Finishing Touches
Finishing touches are like the bow on top that truly makes your landscape feel complete. Make your space unique by adding in container plants, decorations, and outdoor furniture. Mulching around your freshly planted shrubs and trees during this stage is also a good idea to help them establish themselves. Now, enjoy your hard work and your new landscape!
Don’t feel like your project has to include all of these steps or follow our exact order, as this will be different with every landscape. The steps above are just an example to give you an idea of what to consider before putting your plants in the ground.
Remember to take your "after photo" once the hard work is done! Here's a before and after example of a landscape design:
Before:

After:

Perfecting the Layout
Not every design on paper will translate perfectly in real life. If you find yourself unsure about how your plants are positioned in your final design, a great tip is to visualize it in real life! After purchasing your plants, place the pots where you want them in your landscape. Take a step back and walk around to see if there’s any changes that need to be made. Go around and make sure the spacing is correct, as nursery plants will not be full sized just yet.
Don’t feel rushed to plant! After all, it’s much easier on the plant and you if it’s planted only once, so take your time and move or swap plants around until they fit your landscape. If you need a few days, make sure you mark where you had each plant and keep them in a protected or covered area until it’s time to go in the ground.
Guide to Planting
Planting a tree might sound simple, but there’s a technique to it! In order to get your plants established quickly, here’s some detailed instructions on how to plant everything from trees to bulbs.
Step 1: Location
Always choose a location that will accommodate the mature size of your plant, making sure there’s room above ground and below ground for it to expand. Space trees and shrubs the same distance away from a structure like a fence or house as you would another plant.
Step 2: Dig a Hole
Taking a pointed shovel, start digging a planting hole that’s twice as wide as the root ball or the container and just as deep. Roots mainly grow out and not down, so digging the hole wider is highly recommended to make it easier for roots to anchor into the ground.
Step 3: Position the Plant
A plant that’s planted too deep or too shallow will suffer. Avoid this by planting it at the same level it previously was planted at. If you can’t tell, then position the plant so that the roots start about an inch below the final soil line. If your plant is very compacted by roots, break them up and spread out evenly in the hole as you position it.
Step 4: Fill in the Hole
Holding the plant in place, start filling in the remaining hole. If you need to add fertilizer or any amendments to the soil, mix with the soil you previously removed in step 2.
Step 5: Gently Tamp the Soil Down
The trick to this part is to be GENTLE. Many make the mistake of compacting the soil too much, undoing the hard work of digging the planting hole wider and spreading the roots. Too much pressure could even break fragile roots! Using your hands or light pressure with your foot, tuck the plant in. Once tamped down, the plant shouldn’t move or tip over when let go.
Step 6: Water and Mulch
Finish off your planting by giving the plant a long drink of water. Newly planted plants will need more water especially right after being placed in the ground. To avoid making a muddy mess, finish planting an area, then deeply water the area all at once. Finish off with a layer of mulch and staking plants that need extra support.
Refer to this helpful diagram for the planting steps mentioned above:
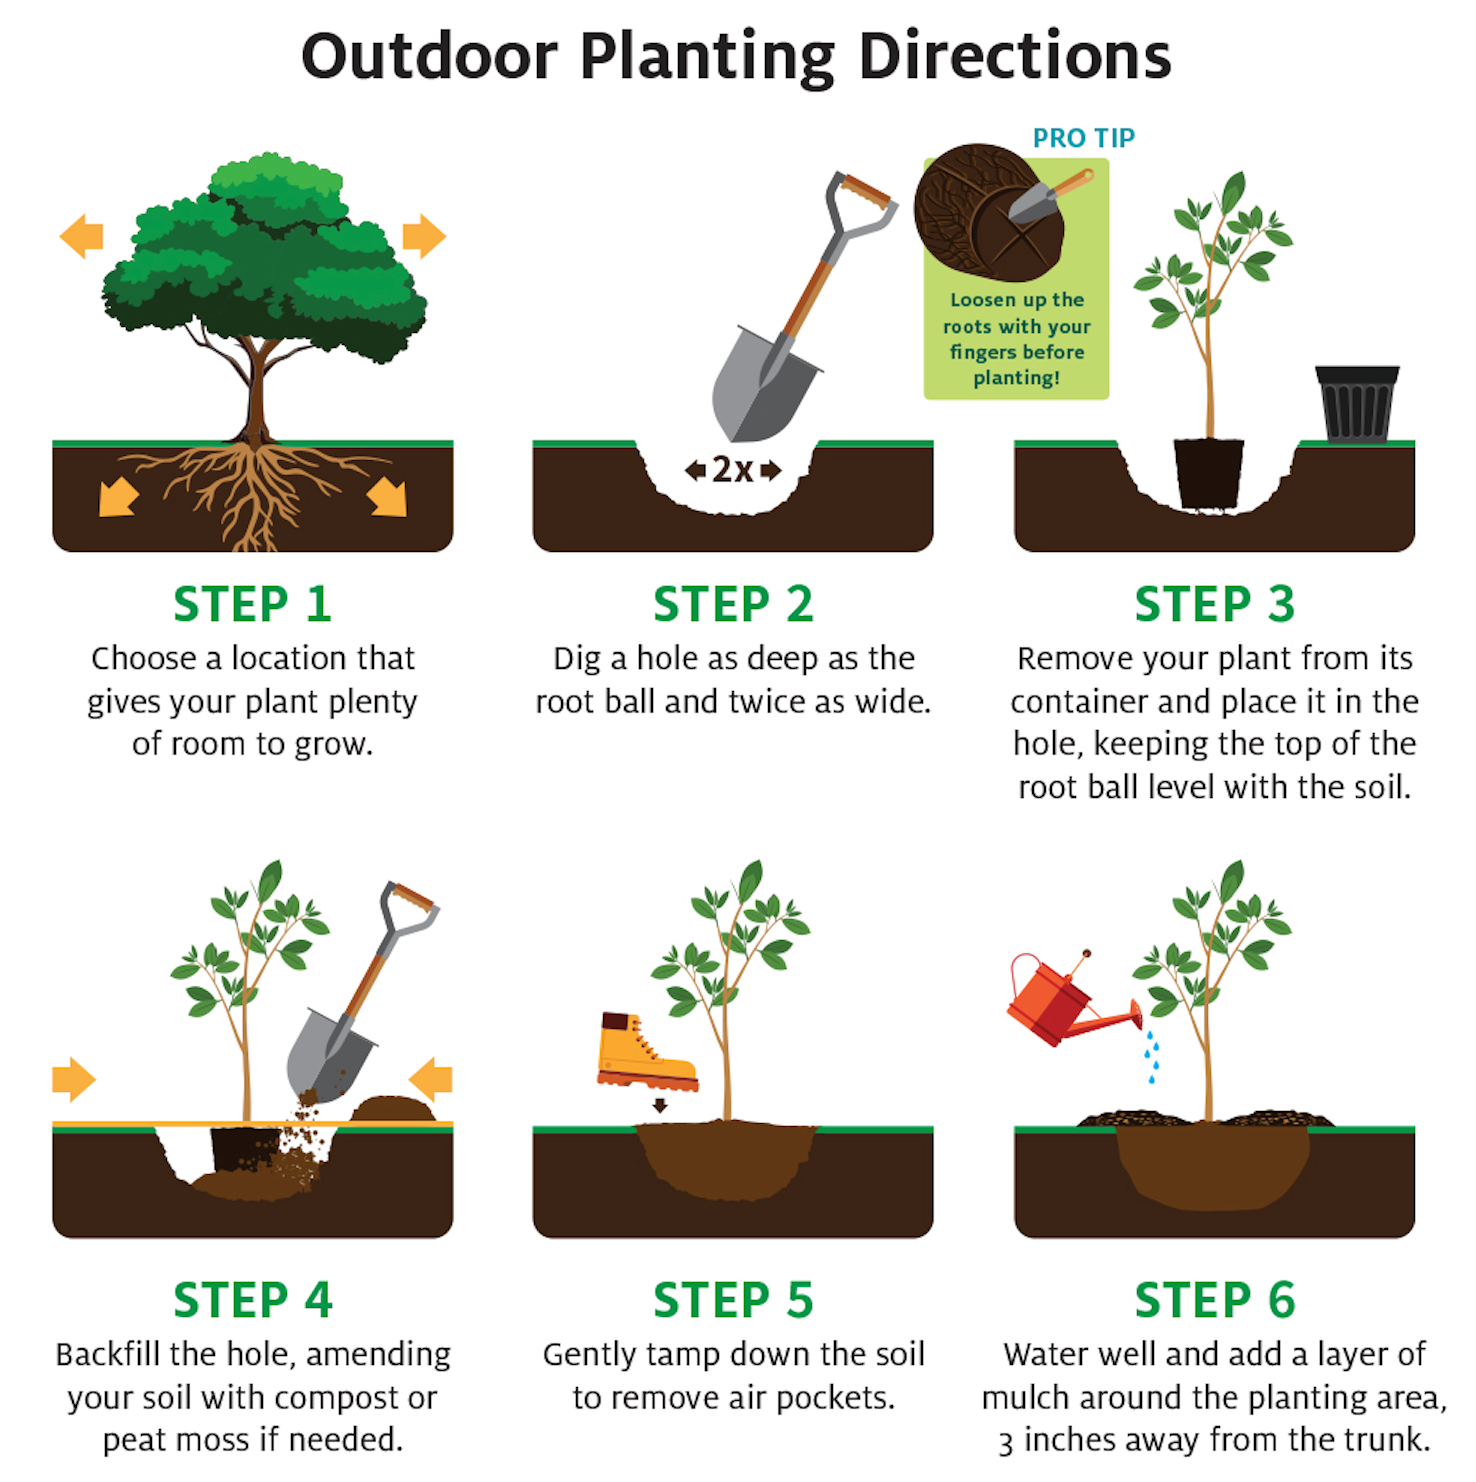
FGT Pro Tip: Never let your mulch or dirt pile against your tree! This can harm your plant and eventually lead to death. Mulch should always be, at the minimum, 3 inches away from the base of the plant. If the base looks like a volcano, you need to even it out!
And if grass is part of your landscape, head over to our Grass Seed 101 mini course for a walkthrough like this one!
Helpful Tips
- Have a measuring tape handy to make sure plants are properly spaced. Too close or too far might throw off your design or crowd your plants. Avoid estimating the distance if you can.
- Work on a cool day or in the mornings and evenings if possible.
- Wet dirt is less dusty, but it’s heavier to move and not good for tilling. Try to work with soil that’s evenly moist but not excessively wet or dry.
- Take breaks! Landscaping is physical work and depending on your project size you might have to do it in stages. Avoid overworking yourself or injuries by pacing yourself and having established times to take breaks.
- Don’t compare yourself to yard crews that have years of experience if you’re deciding to DIY your own landscape, take it at your own pace.
- Unless you’re a farmer or going for a very formal look, stay away from planting in a row. We naturally want to put things in lines, but in your landscape it can alter the look you may be going for. Don’t shy away from asymmetry, curves or groupings of plants if you find yourself putting everything in the same row.
- If you’re feeling overwhelmed or frustrated, we suggest that you take it one step at a time. You can always break down your plan into bite-sized pieces and add more garden projects in the future!
Installing your landscape doesn’t have to be difficult! Having your plan in place ahead of time, following the proper steps and pacing yourself will make the process much less stressful. Remember to take your time and enjoy bringing your landscape vision to life. Once you’re finished, you’ll be able to reap the benefits of your hard work for years to come!
Don't forget to download and print our Installation Worksheet to get organized and create a project timeline, from clean up and installation to finishing touches!
Plus, view the rest of our Landscape Design 101 course to keep learning and transform your landscape! And be sure to check out our wide selection of trees and shrubs for all your plant needs.